If you have ANY questions, please email
me at [email protected]
and I will post my response here.
In Health & With Hope, Doug
:-)
SS SLOGGETT
Cruisin' Full Steam Ahead
1
DAY ONE
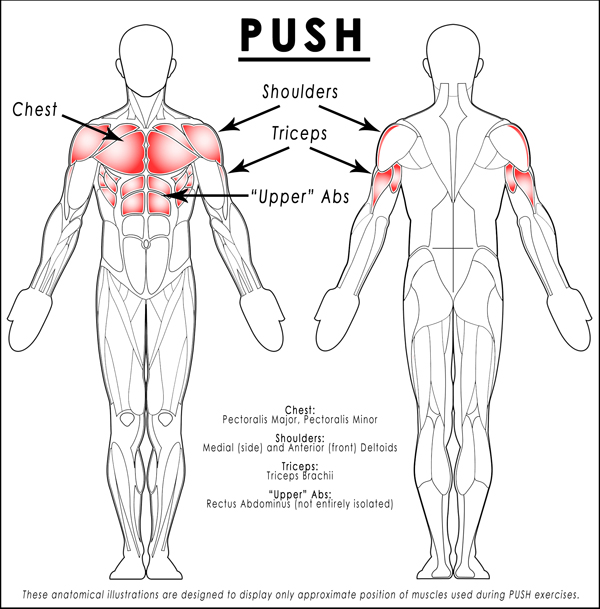
UPPER BODY PUSH
Perform Stamina BEFORE Strength
The initial video, photos, and text are only for reference. Please only perform the specific exercises that we covered together. Think... "Countertop Push-Ups" and "Truck Tailgate Push-Ups".
Perform a few sets of these:
Then, perform a few sets of these:
Perform Stretching AFTER Strength
The Super Secret to Stretching is…
“The Best Way to Relax and
Lengthen Your muscles is to Contract
and Shorten Them First.”
This sounds like a riddle, but it’s actually an absolutely amazing physiological phenomenon, based on instantaneous reactive adaptation via proprioceptive neuromuscular facilitation. Sounds pretty high-tech, huh? Well, it is, especially for a Monday. So let’s wait. In fact, let’s wait until next week to explain this.
For now, let’s keep Stretching simple too. I just want you to know that after you work a muscle, or strength train a muscle, you should stretch a muscle. The key word of that sentence… after!!! Every time you train a muscle for Strength, you then need to train it for Stretching. And, contrary to popular opinion, this should never be done in reverse order. Never stretch first. It doesn’t matter what your coach told you then… or your trainer tells you now. You should always warm-up to stretch, not stretch to warm-up. NEVER!
This is covered in a little more detail on my video series, in a section called “ Training Tricks” (available in Week 4). You can find the link to these videos under the " Muscle Menu."
Since Monday’s exercises are always going to be PUSH exercises, you will always, or at least until further notice, perform a light, steady, static stretch for the PUSH muscle group after the exercise or exercises that we do that day. We’ll get to the fancy Super Stretching stuff later. More than anything right now, I just want you to get into the habit of Stretching after Strength.
So here’s an example of a stretch for PUSH (chest & shoulders) which can be held for 7 seconds, or 77 seconds, or whatever length of time you feel like for today. Here’s how you do it, but don’t do it until when? Right!! Stretching after Strength!!!
STRETCHING PUSH
(Chest & Shoulders)

Proper Stretching is still exercise, and should be performed both deliberately and mechanically. Don’t just throw your arms up, lunge into the stretch, and then flop them back down. It’s not worth the risk of strain, sprain, or pain. Keep things smooth, steady, and slow.
For this stretch, you’re going to stand in a doorway, or perhaps between two trees or other fixed objects, and slowly raise your arms into the “get your hands up” position. Your elbows should end up being just slightly lower than shoulder height.
Step forward with one foot and slowly lean your body forward through the doorway, so that your elbows are pressed backwards by the door frame (or the trees). Don’t push your elbows against the door frame; instead, relax, and let the door frame push back against you. You should feel a gentle and symmetrical stretch in the front of your shoulders and chest. The stretch should be felt in the muscles, and definitely not the joints.
As the muscles relax, you may be able to gradually lean a little further into the stretch, thereby stretching the muscles even more. Again, don’t push against the door frame. This isn’t a contraction… this is a relax-tion. And, once you’re finally fully relaxed, then hold the stretch for at least 7 seconds.
It’s also important to exit the stretch as slowly and carefully as you got into it. Do NOT just drop your arms from the stretched position. The shoulder complex is very complex (hence the name) and it doesn’t take much to twist and tweak the wrong thing. So, after your 7+ second stretch, you want to first slowly reverse direction. In other words, begin to lean backwards, so the pressure against your elbows releases. Then, AND ONLY THEN, is it safe to slowly lower your arms.
Then, just to keep things symmetrical, switch feet position and repeat. And, if you really want to get really picky, next time you do this stretch, start with the opposite foot forward first.
2
DAY TWO
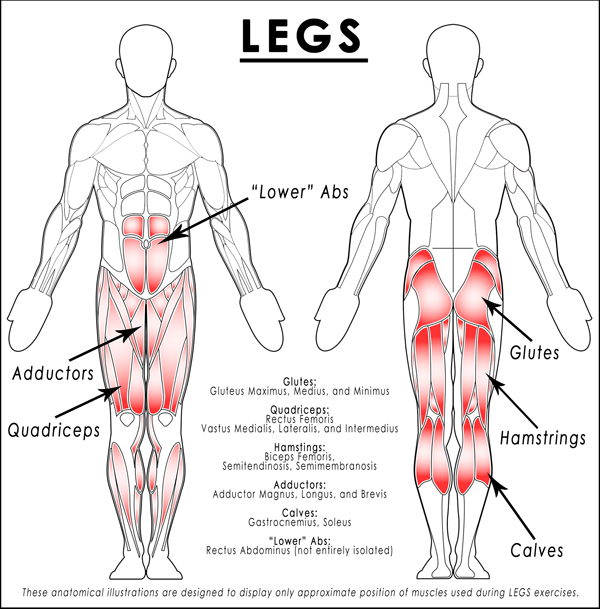
LOWER BODY PRESS
Perform Stamina BEFORE Strength
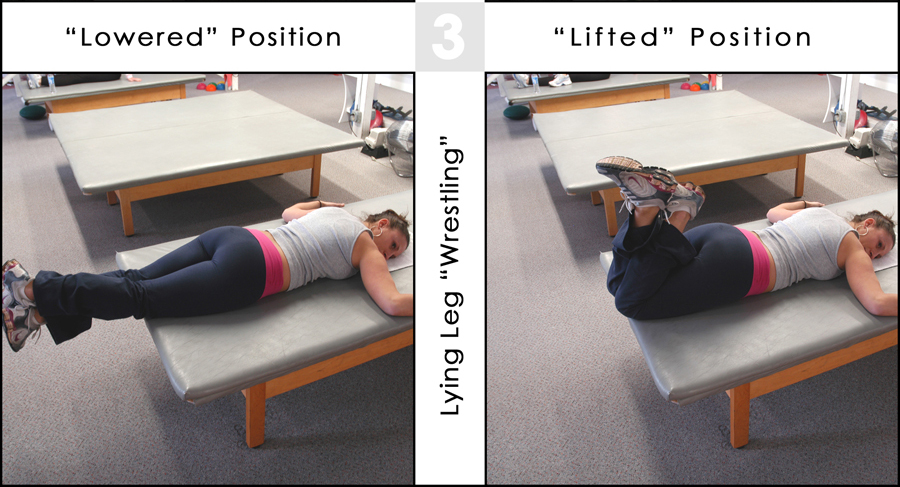
The initial video, photos, and text are only for reference. Please only perform the specific exercises that we covered together... Bench Squats, Strap Squats, Frog Squats, Leg Wrestling.
! NO FROG SQUATS !
(regular light squats should be all right... but maybe avoid the "reversals" and just stick with "regular" and "ratchet)
(click link above for description)
Perform Stretching AFTER Strength
If you remember from Monday,
there is a Super Secret to Stretching:
“The Best Way to Relax and
Lengthen Your Muscles is to Contract
and Shorten Them First.”
As I mentioned then, I am going to wait until next week to explain this conundrum; for now, we’re going to keep Stretching more simple than super.
You hopefully remember the primary point that I’ve made about Stretching so far. Every time you train a muscle for Strength, you then need to train it for Stretching. And, contrary to popular opinion, you should never stretch before Strength, or before Stamina. Have you ever seen people stretching on the side of the road before they go out for a jog? Have you done that yourself? Well, don’t do that. It’s Stamina… then Strength… and THEN Stretching.
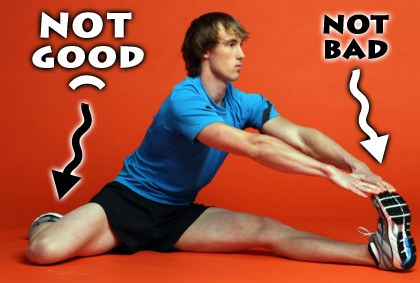
Since today’s exercise is a LEGS exercise, you will be performing a light, steady, static stretch for the LEGS muscle group after you complete your 7 reps, or up to 7 sets, of squats. There are quite a few different muscle groups in the lower body, but today we will be stretching the muscles in the front of the thighs, the quadriceps muscles.
The following is an example of such a stretch for LEGS which can be held for 7 seconds, or 77 seconds, or whatever length of time you feel like for today. Here’s how you do it, but don’t do it until after after you’ve done your squats, right?
And you may want to walk around for a minute or two after performing your squats before you stretch. Depending on how hard you train them, the quadriceps muscles can become quite pumped up with blood from the exercise, sometimes making them a little more difficult to stretch. So, if you have the time, take your time between Strength and Stretching for quadriceps. Once you try it, you’ll see what I mean.
Stretching a muscle is similar to training a muscle, in that there is a definite right and wrong way to safely and properly perform each movement. Just because you aren’t using weights or machines during a stretch doesn’t necessarily mean that a particular movement can’t be dangerous… or pointless, at best. Stretching the quadriceps muscles in the front of the thighs is a perfect example. Here’s the correct technique for sufficiently stretching your quadriceps muscles without accidentally straining or spraining your tendons or ligaments, respectively.
Proper Stretching is still exercise, and should be performed both deliberately and mechanically. Don’t just throw your foot up, back bend to grab it, yank it up, and then slingshot it back down. I’ve seen this happen too many times. It’s not worth the risk of strain, sprain, or pain. Always keep things smooth, steady, and slow.
STRETCHING LEGS
(quadriceps)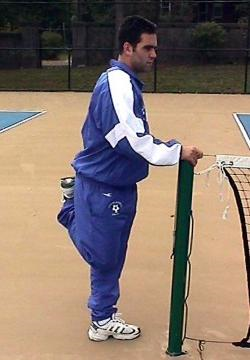
Stand on one leg with a “soft,” slightly-bent knee. Bend your other knee to slowly lift your foot up behind you. Reach back with your OPPOSITE hand and grab your ankle behind your body. As pictured, if you are stretching your right quadriceps muscle, then you will be grabbing your right foot or ankle with your left hand.
Using the OPPOSITE hand is very important, as it will help to prevent injury. People usually use the same hand, but then lift their foot towards the outside of the same side of their body, like in the dangerously-contraindicated hurdler’s stretch.
 This can cause straining of tendons and spraining of ligaments, including the medial collateral ligament on the inside of the knee.
Once your knee is bent, and you have securely grasped your foot or ankle, then slowly move into the fully stretched position. Gradually stand up, completely straight, pushing your hips forward, and slowly pulling back your foot and knee to deepen the stretch.

Because the quadriceps muscle crosses over two joints (the knee and the hip), there are two separate and distinct motions which will increase the stretch of this muscle. The first is bringing your foot as close to your glutes as possible. If you are able, your calf should be flush against the back of your thigh.
The second motion, which many people don’t think about, is moving your knee backwards, which further stretches the portion of the quadriceps at the top of your thigh (specifically, the rectus femoris). The key to this second motion is to NOT lean forward or bend at the hips during this stretch. As you gradually pull your foot upwards and your knee backwards, at the same time, focus on pushing your hips forward and keeping your upper body vertical, or perhaps even leaning backward slightly.
As the muscles relax, you should be able to gradually increase the stretch, thereby stretching the muscles even more. Once you’re finally fully relaxed, then hold the stretch for at least 7 seconds.
Also, it is VERY important to exit the stretch as slowly and carefully as you got into it, especially with this muscle group because you, in effect, just coiled the quadriceps. Your foot is essentially spring-loaded with tension. Do NOT just let go of your foot and let it fly out of the stretched position.
After your 7+ second stretch, you want to first slowly reverse the directions of the stretch. In other words, lean your upper body forward a little, bring your knee forward a little, and lower your foot a little. Once the tension in your quadriceps has been gradually released to as close to nothing as possible, then, AND ONLY THEN, is it safe to slowly let go and lower your foot.
Then, of course, it’s time to stretch the other leg, so you don’t go walking around like you should have had a V8. And, in our quest for symmetry, the next time you stretch your quadriceps, stretch your other leg first.
Stretch your Hamstrings & Calves too!!
3
DAY THREE
UPPER BODY PULL
Perform Stamina BEFORE Strength
The initial video, photos, and text are only for reference. Please only perform the specific exercises that we covered together... such as One-Arm and Two-Arm Strap Rows."
Stretching AFTER Strength
As I have already mentioned earlier this week, I am going to wait until next week to use the super scientific secret to speedy Stretching. For today, we are going to continue to keep Stretching super simple.
I am sure that, by now, you know my primary tenet regarding Stretching. Every time you train a muscle for Strength, you then need to train it for Stretching. And, contrary to popular opinion, you should never stretch before Strength, or before Stamina. No matter what specific system you are using for each section on a particular day, the order is ALWAYS Stamina… then Strength… and THEN Stretching.
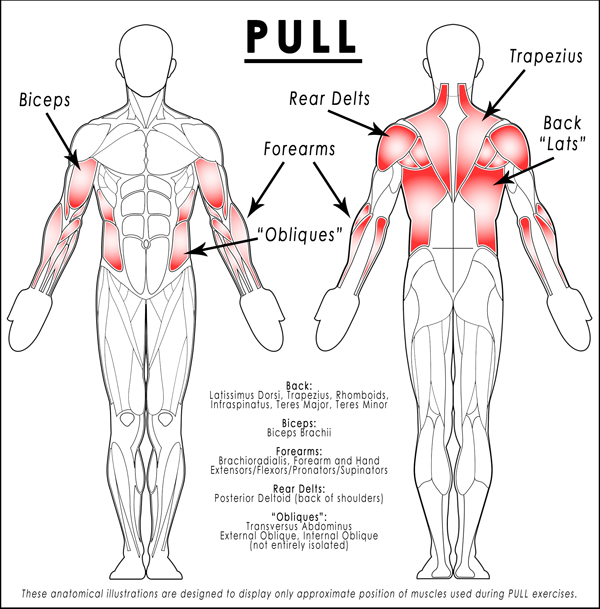
Since today’s exercise is a PULL exercise, you will be performing a light, steady, static stretch for the PULL muscle group after you complete your single-to-seven sets of chin-ups. Although chin-ups work your forearms, your two arms, and the multitude of muscles in your mid- and upper back, today we will focus on stretching the largest of these muscles, the largest in your entire upper body, the latissimus dorsi, or “lats.”
The following is an example of such a stretch for PULL which can be held for 7 seconds, or 77 seconds, or whatever length of time you feel like for today. Here’s how you do it, but don’t do it until after you’ve done your chin-ups first, right?
Stretching a muscle is similar to strength training a muscle, in that there is a definite right and wrong way to safely and properly perform each movement. Stretching the latissimus dorsi is a great example of a stretch being relatively pointless unless you really focus on following proper procedure. It’s a huge muscle group with a tremendous range of motion (think about the complex circumduction, or roundabout, movement of your shoulder joint); so, if you don’t stretch it exactly right, you won’t feel much, and it won’t do much.
Although a picture is worth a thousand words, you can’t believe everything you see. So, read the text below too. Or, better yet, sit back and listen to me read it to you.
STRETCHING PULL
(latissimus dorsi)

Proper Stretching is still exercise and should be performed both deliberately and mechanically. In other words, as with Strength exercises, Stretching exercises should also be performed “on purpose” and with specific intention. Just don’t haphazardly throw your body into a stretch and expect to get anything out of it or, worse yet, expect to get out of it without overstretching, straining, or spraining something. It is possible to achieve increased flexibility of a muscle in as little as 7 seconds but, to accomplish this, you need to learn the precise procedure to follow for each and every stretch.
When stretching the latissimus dorsi, as with any muscle, always keep your movements smooth, steady, and slow. And, as this stretch is unilateral, or one-sided, as are many, it should be fairly obvious that you need to repeat this stretch for both sides of your body. What might not be so obvious is that you don’t want to get into the routine of always starting the stretch with the same side first.
So, during this workout, start the stretch with your left arm first, as pictured. Then, for your next workout, start this stretch with your right arm first. Or, if you are performing multiple sets of chin-ups and are going to stretch in between each and every set, alternate “starting arms” after each set. Perform chin-ups… stretch the left side, then the right. Perform chin-ups… stretch the right side, then the left. And so on. Just be aware of balance in your body and always do your best to maintain symmetry in all that you do for Strength, Stamina, and Stretching.
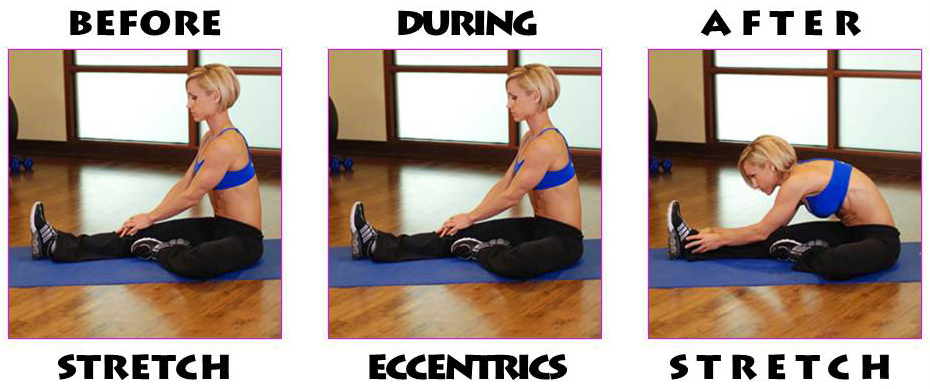
A good way to visualize Stretching is to consider it the opposite of Strength. If you know how a muscle contracts during a Strength exercise, it’s easy to determine the appropriate Stretching movement for that muscle. In fact, the exact opposite motion of the contraction is the specific stretch for that muscle. The stretch is actually a passively-exaggerated continuation of the movement of Eccentrics in Strength, the muscle-lengthening portion of the exercise. Instead of trying to resist the lengthening process (as you do during Strength training), during training for Stretching you are totally relaxing the muscle and allowing it to passively elongate to it’s fully-stretched potential… at least for now. Next week we’ll upset that apple cart too.
Anyway, for the latissimus dorsi, or “lats,” you have learned that the basic Strength motion during a contraction of this muscle is bringing your elbow from a point away from your body to a position where your elbow is close to your body. Then, during the process of eccentric muscle lengthening, your elbow again moves away from your body. By continuing this muscle-lengthening process, by moving your elbow away from your body as far as realistically possible, you will thereby realize the best degree of Stretching for this muscle.
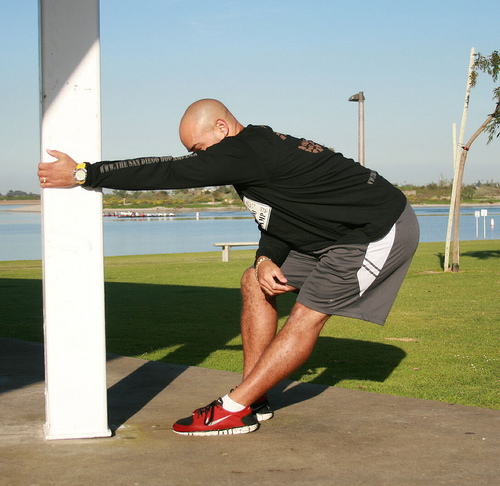
Also, keep in mind that, at least for now, there is to be no contracting during the stretch. In the photo above, it looks as if the person is pulling on the fixed object by contracting the muscles of the upper back. On the contrary, the person is totally relaxing the muscles of the upper back, and then using the object to help passively pull the elbow farther away from the body. In essence, the arm is gradually being pulled out of the shoulder socket; not really, but it’s the thought that counts, right? This action greatly deepens the stretch within the latissimus dorsi muscle. You will see what I mean when you try it. Are you ready? Here goes:
Starting with your left side, as pictured, hold onto a very strong and secure object with your left hand at approximately waist height. Your hand can be placed in several different positions but, for now, use a “thumbs up” grip if you are able.

Place your left foot in a position that is far enough away from the object so that your arm is completely straight as you bow forward and push your hips backwards. You will probably have to reposition your foot a few times as you properly position yourself. This is fine. Most of your body weight should be placed on your left leg, though some of it can be placed on the right one too. To help reduce any strain on the lower back, it is best to have a slight bend in both knees during this stretch.
Again, during this stretch, you are not trying to pull on the object. Instead, you are letting the object pull your arm and your elbow away from your body. Contract your hand to hang on, but totally relax your lat muscle to stretch.
As you bow forward and bring your head down close to your arm, while pushing your hips backwards, you should begin to feel the stretch on the muscle, from just underneath your armpit all the way down to the side of your waist. Keep your feet positioned under your body enough so that, if you let go of the object, although you would move backwards, you would not fall down. Keeping both knees slightly bent definitely helps.
Using a “thumbs up” hand position during this stretch is the best place to start; however, you can adjust your hand rotation to increase the degree of stretch in the muscle, depending upon the shape of the object that you are grabbing onto and how much stretch you desire. The “thumb up, pinky down” position puts the least amount of strain on the shoulder joint, but also the least amount of potential stretch on the muscle. If you have no shoulder issues, you can deepen the stretch in the muscle by internally rotating your hand and arm. But be careful because this also slightly increases the strain on the shoulder and joint capsule.
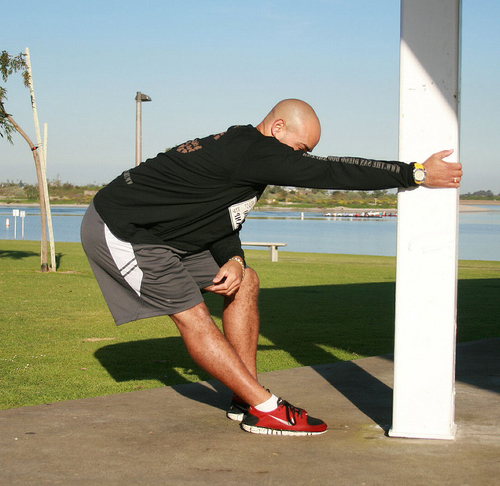
Turning your hand inward and using a “palm down” position, as you would when holding onto a horizontal bar or railing, notches up the severity of the stretch. To really up the ante and get the strongest stretch possible, hold onto a vertical bar or railing and use an overhand “thumb down, pinky up” position. In this example, pictured above, you would rotate your left hand clockwise by 180 degrees, holding onto the opposite side of the object, with your thumb facing the ground.
(More Advanced Thumb Down Option)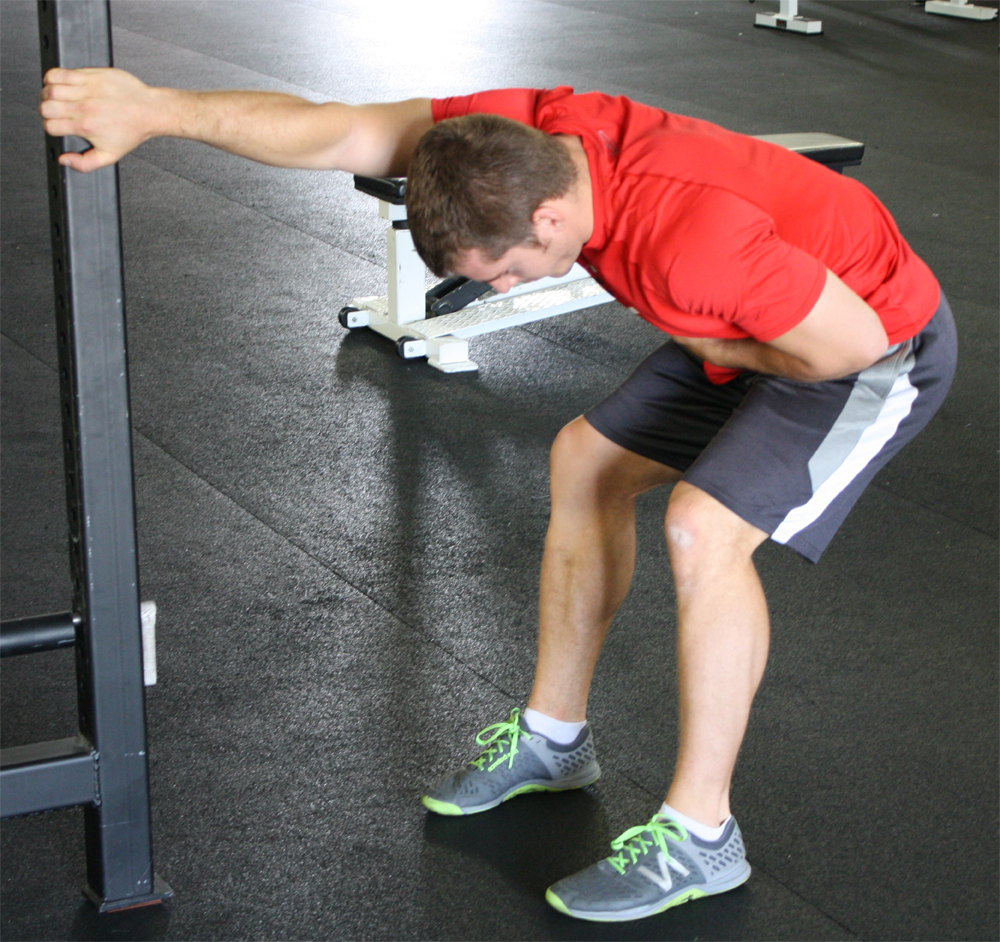
Again, while a “thumb down” hand placement gives you the most potential for stretch for the latissimus dorsi muscle, it does so with a little more strain on the shoulder joint. Because there is no movement during the stretch, it is usually fine for the majority of individuals. But, if you have any shoulder concerns, it’s probably best to use the initial “thumb up” position. Safe always beats sorry.
As the muscles relax, you should be able to gradually increase the stretch, thereby stretching the muscles even more. Once you’re finally fully relaxed, then hold the stretch for at least 7 seconds.
Also, it is VERY important to exit the stretch as slowly and carefully as you got into it, especially with this muscle group because you, in effect, just lengthened your spine and stretched one side of the lower back. So, do NOT just let go with your hand and let your body fly out of the stretched position. After your 7+ second stretch, you want to bend your knees a little more, move your body slightly closer to the object to which you are holding, and then gradually stand up to come out of the stretch. Then, rinse and repeat with the other side.
Because this stretch is a little difficult to visualize with the opposite arm, here is the same photo flipped horizontally. Everything is the same, only backwards.
4
DAY FOUR
"Stamina & Abdominals"
Perform Stamina BEFORE Strength
5
DAY FIVE
UPPER BODY PUSH
Perform Stamina BEFORE Strength
The initial video, photos, and text are only for reference. Please only perform the specific exercises that we covered together. Think... "Countertop Push-Ups" and "Truck Tailgate Push-Ups".
Perform a few sets of these:
Then, perform a few sets of these:
Perform Stretching AFTER Strength
The Super Secret to Stretching is…
“The Best Way to Relax and
Lengthen Your muscles is to Contract
and Shorten Them First.”
This sounds like a riddle, but it’s actually an absolutely amazing physiological phenomenon, based on instantaneous reactive adaptation via proprioceptive neuromuscular facilitation. Sounds pretty high-tech, huh? Well, it is, especially for a Monday. So let’s wait. In fact, let’s wait until next week to explain this.
For now, let’s keep Stretching simple too. I just want you to know that after you work a muscle, or strength train a muscle, you should stretch a muscle. The key word of that sentence… after!!! Every time you train a muscle for Strength, you then need to train it for Stretching. And, contrary to popular opinion, this should never be done in reverse order. Never stretch first. It doesn’t matter what your coach told you then… or your trainer tells you now. You should always warm-up to stretch, not stretch to warm-up. NEVER!
This is covered in a little more detail on my video series, in a section called “ Training Tricks” (available in Week 4). You can find the link to these videos under the " Muscle Menu."
Since Monday’s exercises are always going to be PUSH exercises, you will always, or at least until further notice, perform a light, steady, static stretch for the PUSH muscle group after the exercise or exercises that we do that day. We’ll get to the fancy Super Stretching stuff later. More than anything right now, I just want you to get into the habit of Stretching after Strength.
So here’s an example of a stretch for PUSH (chest & shoulders) which can be held for 7 seconds, or 77 seconds, or whatever length of time you feel like for today. Here’s how you do it, but don’t do it until when? Right!! Stretching after Strength!!!
STRETCHING PUSH
(Chest & Shoulders)
Proper Stretching is still exercise, and should be performed both deliberately and mechanically. Don’t just throw your arms up, lunge into the stretch, and then flop them back down. It’s not worth the risk of strain, sprain, or pain. Keep things smooth, steady, and slow.
For this stretch, you’re going to stand in a doorway, or perhaps between two trees or other fixed objects, and slowly raise your arms into the “get your hands up” position. Your elbows should end up being just slightly lower than shoulder height.
Step forward with one foot and slowly lean your body forward through the doorway, so that your elbows are pressed backwards by the door frame (or the trees). Don’t push your elbows against the door frame; instead, relax, and let the door frame push back against you. You should feel a gentle and symmetrical stretch in the front of your shoulders and chest. The stretch should be felt in the muscles, and definitely not the joints.
As the muscles relax, you may be able to gradually lean a little further into the stretch, thereby stretching the muscles even more. Again, don’t push against the door frame. This isn’t a contraction… this is a relax-tion. And, once you’re finally fully relaxed, then hold the stretch for at least 7 seconds.
It’s also important to exit the stretch as slowly and carefully as you got into it. Do NOT just drop your arms from the stretched position. The shoulder complex is very complex (hence the name) and it doesn’t take much to twist and tweak the wrong thing. So, after your 7+ second stretch, you want to first slowly reverse direction. In other words, begin to lean backwards, so the pressure against your elbows releases. Then, AND ONLY THEN, is it safe to slowly lower your arms.
Then, just to keep things symmetrical, switch feet position and repeat. And, if you really want to get really picky, next time you do this stretch, start with the opposite foot forward first.
6
DAY SIX
LOWER BODY PRESS
Don't forget to do a few calf raises...
and then stretch them out too. ;-)
Perform Stamina BEFORE Strength
The initial video, photos, and text are only for reference. Please only perform the specific exercises that we covered together... Bench Squats, Strap Squats, Frog Squats, Leg Wrestling.
! NO FROG SQUATS !
(click link above for description)
Perform Stretching AFTER Strength
If you remember from Monday,
there is a Super Secret to Stretching:
“The Best Way to Relax and
Lengthen Your Muscles is to Contract
and Shorten Them First.”
As I mentioned then, I am going to wait until next week to explain this conundrum; for now, we’re going to keep Stretching more simple than super.
You hopefully remember the primary point that I’ve made about Stretching so far. Every time you train a muscle for Strength, you then need to train it for Stretching. And, contrary to popular opinion, you should never stretch before Strength, or before Stamina. Have you ever seen people stretching on the side of the road before they go out for a jog? Have you done that yourself? Well, don’t do that. It’s Stamina… then Strength… and THEN Stretching.
Since today’s exercise is a LEGS exercise, you will be performing a light, steady, static stretch for the LEGS muscle group after you complete your 7 reps, or up to 7 sets, of squats. There are quite a few different muscle groups in the lower body, but today we will be stretching the muscles in the front of the thighs, the quadriceps muscles.
The following is an example of such a stretch for LEGS which can be held for 7 seconds, or 77 seconds, or whatever length of time you feel like for today. Here’s how you do it, but don’t do it until after after you’ve done your squats, right?
And you may want to walk around for a minute or two after performing your squats before you stretch. Depending on how hard you train them, the quadriceps muscles can become quite pumped up with blood from the exercise, sometimes making them a little more difficult to stretch. So, if you have the time, take your time between Strength and Stretching for quadriceps. Once you try it, you’ll see what I mean.
Stretching a muscle is similar to training a muscle, in that there is a definite right and wrong way to safely and properly perform each movement. Just because you aren’t using weights or machines during a stretch doesn’t necessarily mean that a particular movement can’t be dangerous… or pointless, at best. Stretching the quadriceps muscles in the front of the thighs is a perfect example. Here’s the correct technique for sufficiently stretching your quadriceps muscles without accidentally straining or spraining your tendons or ligaments, respectively.
Proper Stretching is still exercise, and should be performed both deliberately and mechanically. Don’t just throw your foot up, back bend to grab it, yank it up, and then slingshot it back down. I’ve seen this happen too many times. It’s not worth the risk of strain, sprain, or pain. Always keep things smooth, steady, and slow.
STRETCHING LEGS
(quadriceps)
Stand on one leg with a “soft,” slightly-bent knee. Bend your other knee to slowly lift your foot up behind you. Reach back with your OPPOSITE hand and grab your ankle behind your body. As pictured, if you are stretching your right quadriceps muscle, then you will be grabbing your right foot or ankle with your left hand.
Using the OPPOSITE hand is very important, as it will help to prevent injury. People usually use the same hand, but then lift their foot towards the outside of the same side of their body, like in the dangerously-contraindicated hurdler’s stretch.
This can cause straining of tendons and spraining of ligaments, including the medial collateral ligament on the inside of the knee.
Once your knee is bent, and you have securely grasped your foot or ankle, then slowly move into the fully stretched position. Gradually stand up, completely straight, pushing your hips forward, and slowly pulling back your foot and knee to deepen the stretch.
Because the quadriceps muscle crosses over two joints (the knee and the hip), there are two separate and distinct motions which will increase the stretch of this muscle. The first is bringing your foot as close to your glutes as possible. If you are able, your calf should be flush against the back of your thigh.
The second motion, which many people don’t think about, is moving your knee backwards, which further stretches the portion of the quadriceps at the top of your thigh (specifically, the rectus femoris). The key to this second motion is to NOT lean forward or bend at the hips during this stretch. As you gradually pull your foot upwards and your knee backwards, at the same time, focus on pushing your hips forward and keeping your upper body vertical, or perhaps even leaning backward slightly.
As the muscles relax, you should be able to gradually increase the stretch, thereby stretching the muscles even more. Once you’re finally fully relaxed, then hold the stretch for at least 7 seconds.
Also, it is VERY important to exit the stretch as slowly and carefully as you got into it, especially with this muscle group because you, in effect, just coiled the quadriceps. Your foot is essentially spring-loaded with tension. Do NOT just let go of your foot and let it fly out of the stretched position.
After your 7+ second stretch, you want to first slowly reverse the directions of the stretch. In other words, lean your upper body forward a little, bring your knee forward a little, and lower your foot a little. Once the tension in your quadriceps has been gradually released to as close to nothing as possible, then, AND ONLY THEN, is it safe to slowly let go and lower your foot.
Then, of course, it’s time to stretch the other leg, so you don’t go walking around like you should have had a V8. And, in our quest for symmetry, the next time you stretch your quadriceps, stretch your other leg first.
Stretch your Hamstrings & Calves too!!
SS SLOGGETT
Cruisin' Full Steam Ahead
7
DAY SEVEN
UPPER BODY PULL
Perform Stamina BEFORE Strength
The initial video, photos, and text are only for reference. Please only perform the specific exercises that we covered together... such as One-Arm and Two-Arm Strap Rows."
Stretching AFTER Strength
As I have already mentioned earlier this week, I am going to wait until next week to use the super scientific secret to speedy Stretching. For today, we are going to continue to keep Stretching super simple.
I am sure that, by now, you know my primary tenet regarding Stretching. Every time you train a muscle for Strength, you then need to train it for Stretching. And, contrary to popular opinion, you should never stretch before Strength, or before Stamina. No matter what specific system you are using for each section on a particular day, the order is ALWAYS Stamina… then Strength… and THEN Stretching.
Since today’s exercise is a PULL exercise, you will be performing a light, steady, static stretch for the PULL muscle group after you complete your single-to-seven sets of chin-ups. Although chin-ups work your forearms, your two arms, and the multitude of muscles in your mid- and upper back, today we will focus on stretching the largest of these muscles, the largest in your entire upper body, the latissimus dorsi, or “lats.”
The following is an example of such a stretch for PULL which can be held for 7 seconds, or 77 seconds, or whatever length of time you feel like for today. Here’s how you do it, but don’t do it until after you’ve done your chin-ups first, right?
Stretching a muscle is similar to strength training a muscle, in that there is a definite right and wrong way to safely and properly perform each movement. Stretching the latissimus dorsi is a great example of a stretch being relatively pointless unless you really focus on following proper procedure. It’s a huge muscle group with a tremendous range of motion (think about the complex circumduction, or roundabout, movement of your shoulder joint); so, if you don’t stretch it exactly right, you won’t feel much, and it won’t do much.
Although a picture is worth a thousand words, you can’t believe everything you see. So, read the text below too. Or, better yet, sit back and listen to me read it to you.
STRETCHING PULL
(latissimus dorsi)
Proper Stretching is still exercise and should be performed both deliberately and mechanically. In other words, as with Strength exercises, Stretching exercises should also be performed “on purpose” and with specific intention. Just don’t haphazardly throw your body into a stretch and expect to get anything out of it or, worse yet, expect to get out of it without overstretching, straining, or spraining something. It is possible to achieve increased flexibility of a muscle in as little as 7 seconds but, to accomplish this, you need to learn the precise procedure to follow for each and every stretch.
When stretching the latissimus dorsi, as with any muscle, always keep your movements smooth, steady, and slow. And, as this stretch is unilateral, or one-sided, as are many, it should be fairly obvious that you need to repeat this stretch for both sides of your body. What might not be so obvious is that you don’t want to get into the routine of always starting the stretch with the same side first.
So, during this workout, start the stretch with your left arm first, as pictured. Then, for your next workout, start this stretch with your right arm first. Or, if you are performing multiple sets of chin-ups and are going to stretch in between each and every set, alternate “starting arms” after each set. Perform chin-ups… stretch the left side, then the right. Perform chin-ups… stretch the right side, then the left. And so on. Just be aware of balance in your body and always do your best to maintain symmetry in all that you do for Strength, Stamina, and Stretching.
A good way to visualize Stretching is to consider it the opposite of Strength. If you know how a muscle contracts during a Strength exercise, it’s easy to determine the appropriate Stretching movement for that muscle. In fact, the exact opposite motion of the contraction is the specific stretch for that muscle. The stretch is actually a passively-exaggerated continuation of the movement of Eccentrics in Strength, the muscle-lengthening portion of the exercise. Instead of trying to resist the lengthening process (as you do during Strength training), during training for Stretching you are totally relaxing the muscle and allowing it to passively elongate to it’s fully-stretched potential… at least for now. Next week we’ll upset that apple cart too.
Anyway, for the latissimus dorsi, or “lats,” you have learned that the basic Strength motion during a contraction of this muscle is bringing your elbow from a point away from your body to a position where your elbow is close to your body. Then, during the process of eccentric muscle lengthening, your elbow again moves away from your body. By continuing this muscle-lengthening process, by moving your elbow away from your body as far as realistically possible, you will thereby realize the best degree of Stretching for this muscle.
Also, keep in mind that, at least for now, there is to be no contracting during the stretch. In the photo above, it looks as if the person is pulling on the fixed object by contracting the muscles of the upper back. On the contrary, the person is totally relaxing the muscles of the upper back, and then using the object to help passively pull the elbow farther away from the body. In essence, the arm is gradually being pulled out of the shoulder socket; not really, but it’s the thought that counts, right? This action greatly deepens the stretch within the latissimus dorsi muscle. You will see what I mean when you try it. Are you ready? Here goes:
Starting with your left side, as pictured, hold onto a very strong and secure object with your left hand at approximately waist height. Your hand can be placed in several different positions but, for now, use a “thumbs up” grip if you are able.
Place your left foot in a position that is far enough away from the object so that your arm is completely straight as you bow forward and push your hips backwards. You will probably have to reposition your foot a few times as you properly position yourself. This is fine. Most of your body weight should be placed on your left leg, though some of it can be placed on the right one too. To help reduce any strain on the lower back, it is best to have a slight bend in both knees during this stretch.
Again, during this stretch, you are not trying to pull on the object. Instead, you are letting the object pull your arm and your elbow away from your body. Contract your hand to hang on, but totally relax your lat muscle to stretch.
As you bow forward and bring your head down close to your arm, while pushing your hips backwards, you should begin to feel the stretch on the muscle, from just underneath your armpit all the way down to the side of your waist. Keep your feet positioned under your body enough so that, if you let go of the object, although you would move backwards, you would not fall down. Keeping both knees slightly bent definitely helps.
Using a “thumbs up” hand position during this stretch is the best place to start; however, you can adjust your hand rotation to increase the degree of stretch in the muscle, depending upon the shape of the object that you are grabbing onto and how much stretch you desire. The “thumb up, pinky down” position puts the least amount of strain on the shoulder joint, but also the least amount of potential stretch on the muscle. If you have no shoulder issues, you can deepen the stretch in the muscle by internally rotating your hand and arm. But be careful because this also slightly increases the strain on the shoulder and joint capsule.
Turning your hand inward and using a “palm down” position, as you would when holding onto a horizontal bar or railing, notches up the severity of the stretch. To really up the ante and get the strongest stretch possible, hold onto a vertical bar or railing and use an overhand “thumb down, pinky up” position. In this example, pictured above, you would rotate your left hand clockwise by 180 degrees, holding onto the opposite side of the object, with your thumb facing the ground.
(More Advanced Thumb Down Option)
Again, while a “thumb down” hand placement gives you the most potential for stretch for the latissimus dorsi muscle, it does so with a little more strain on the shoulder joint. Because there is no movement during the stretch, it is usually fine for the majority of individuals. But, if you have any shoulder concerns, it’s probably best to use the initial “thumb up” position. Safe always beats sorry.
As the muscles relax, you should be able to gradually increase the stretch, thereby stretching the muscles even more. Once you’re finally fully relaxed, then hold the stretch for at least 7 seconds.
Also, it is VERY important to exit the stretch as slowly and carefully as you got into it, especially with this muscle group because you, in effect, just lengthened your spine and stretched one side of the lower back. So, do NOT just let go with your hand and let your body fly out of the stretched position. After your 7+ second stretch, you want to bend your knees a little more, move your body slightly closer to the object to which you are holding, and then gradually stand up to come out of the stretch. Then, rinse and repeat with the other side.
Because this stretch is a little difficult to visualize with the opposite arm, here is the same photo flipped horizontally. Everything is the same, only backwards.